
Tick Identification Guide
Tick Markings: Patterns That Reveal the Species
Learn how to recognize tick markings, body patterns, and visual clues that help with tick identification. Includes photo tips, safety notes, and when to seek help.
If you’re trying to identify a tick, the markings on its body can be useful clues—but they are only one part of the picture. Tick markings can include light or dark patches, shield-like patterns, color differences on the back, and subtle body contrasts that help narrow down a tick’s type. Because ticks change appearance as they feed and grow, the same tick can look different at different stages.
This guide explains what tick markings may look like, how to compare them with other visible features, and when it’s best to use a photo-based identification tool for a second look.
Quick safety note
Tick identification is for awareness, not diagnosis. A tick’s appearance can help you compare it with reference photos, but it cannot tell you whether the tick carried a pathogen or whether a bite will cause illness. If a tick has been attached for a long time, if you develop symptoms after a bite, or if you are unsure what you found, consider seeking medical advice. For removal and prevention guidance, public-health sources such as the CDC are a good starting point.
What are tick markings?
Tick markings are the visible patterns, colors, and contrasting areas on a tick’s body. These may appear on the back, around the shield-like area near the front, or across the body depending on the species and life stage. In practical terms, markings are what help a person tell one type of tick from another when using a photo, a chart, or a guide.
Common examples of visible tick markings include:
- Light spots or pale patches on the back
- Dark, uniform coloration with little contrast
- A patterned or mottled shield near the front of the body
- Reddish-brown, black, or tan body tones
- Leg color that differs from the body color
These markings are easiest to evaluate when the tick is flat, intact, and clearly photographed from above.
Key identification features to check along with tick markings
Markings alone rarely identify a tick with confidence. A better approach is to look at several features together. The table below shows the most useful visual clues to compare.
| Feature | What to look for | Why it matters |
|---|---|---|
| Tick markings | Spots, contrasting patches, uniform color, or patterned shield area | Primary visual clue for comparison photos |
| Body shape | Round, oval, or more flattened when unfed | Helps separate life stages and general tick groups |
| Legs | Number visible, color, and thickness | Ticks have eight legs in later stages; leg color can help in matching guides |
| Shield area | Hard plate near the front of the back | Often the most distinctive area for pattern comparison |
| Size | Very small, seed-like, or larger depending on stage and feeding | Size changes can affect how markings appear in photos |
| Engorgement | Flat versus swollen after feeding | Can hide markings and change body shape dramatically |
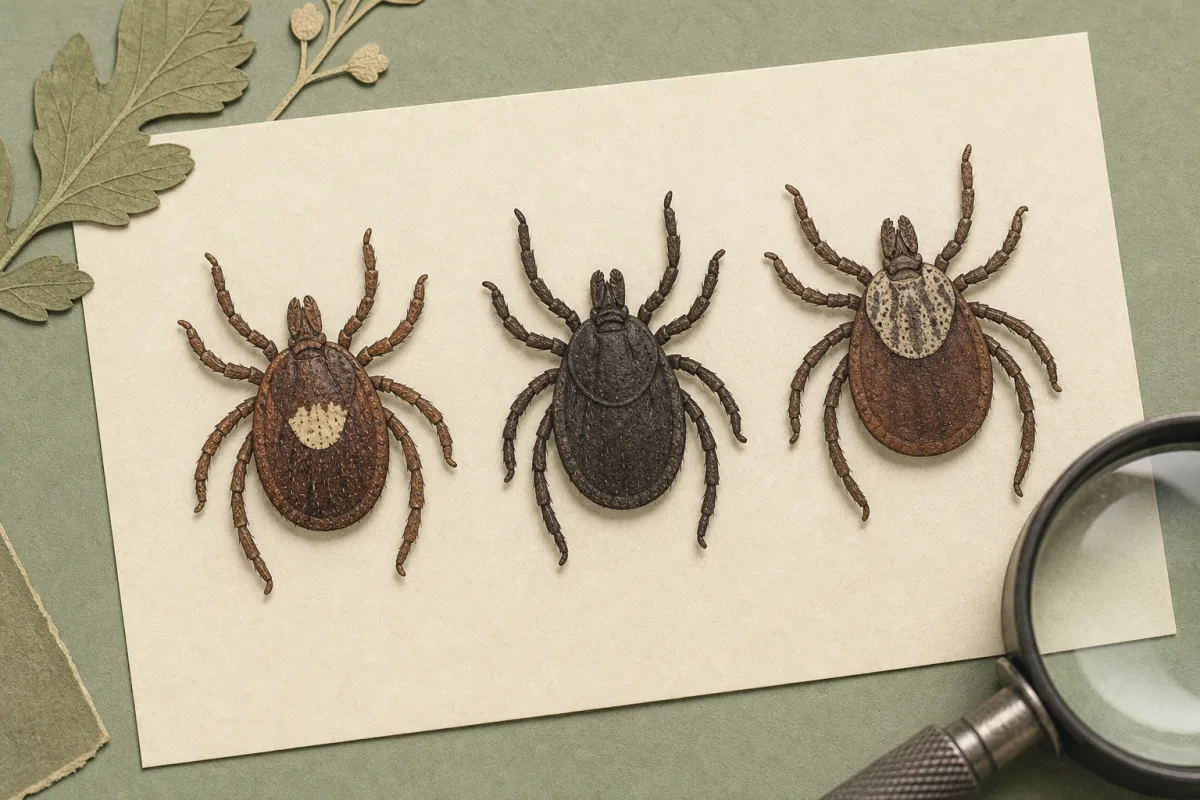
How tick markings may appear in photos
Photos can make tick markings easier to see than the naked eye, especially if the tick is tiny. Good lighting and a sharp image matter more than zoom alone. A close, well-lit image can show contrast on the back, leg color, and the outline of the body much more clearly.
Look for these photo clues:
- Back pattern: Does the back look plain, spotted, or mottled?
- Front shield: Is there a darker or lighter area near the head end?
- Edge of the body: Is the body smooth or does it appear patterned around the sides?
- Leg contrast: Are the legs lighter, darker, or the same color as the body?
- Feeding state: Is the tick flat or swollen, which may blur markings?
If you’re trying to identify a tick from a photo, a reference guide can help you compare what you see. You can also use the site’s Identify Tick by Photo guide to understand what image details matter most.
Simple comparison guide: what markings can suggest
Different ticks may share similar markings, so this table should be used as a comparison tool rather than a final answer. It is best for narrowing possibilities.
| Visible marking style | What it may indicate | Helpful note |
|---|---|---|
| Light patch or pale spot on the back | Some adult ticks may show a distinctive pale marking | Check whether the tick is flat and fully visible before comparing |
| Plain, dark back with little contrast | Could match several common tick types or life stages | Look at size and shield shape for more clues |
| Mottled or patterned shield near the front | May indicate a patterned species or a distinct life stage | Photograph from above for the clearest comparison |
| Reddish-brown body with darker legs | Common among several tick groups | Color alone is not enough for identification |
| Very small body with unclear markings | Could be a nymph or another small stage | Small ticks are harder to identify visually and may need a chart |
Why tick markings can be hard to see
Markings are not always obvious. A tick may be too small, partially hidden, or changed by feeding. Dry skin, dirt, hair, or a blurry photo can also make the body pattern hard to read. In addition, some ticks have subtle markings that look different under indoor light compared with outdoor light.
Common reasons markings are difficult to assess include:
- The tick is a tiny nymph or early-stage tick
- The tick is engorged and stretched
- The image is out of focus or too dark
- The tick was crushed or damaged during removal
- The body is partially covered by hair, clothing fibers, or debris
For a broader overview of what to look for on ticks, the page Look for Ticks: Complete Guide can help connect body features with common places to inspect.
Photo tips for clearer tick identification
If you want a useful image of tick markings, try to capture the tick before it is discarded. Use steady hands, bright light, and a plain background. A coin or ruler nearby can help show size, but avoid touching the tick unless it has been safely removed.
- Place the tick on a light-colored surface if it is already removed.
- Take one image from directly above.
- Take a second image from the side if possible.
- Use natural light or a bright lamp without heavy glare.
- Keep the image sharp enough to show the back, legs, and overall outline.
If you’re comparing your photo to examples, a chart or photo library can be helpful. The site’s Tick Identification Chart is a useful next step when markings are unclear.

When to seek help after finding a tick
Seek medical advice if you have concerns after a tick bite, especially if the bite area changes, you feel unwell, or you are unsure how long the tick may have been attached. Public-health guidance also recommends getting help if you cannot remove the tick fully or if the bite site becomes increasingly irritated.
Watch for general warning signs such as:
- Fever or flu-like feelings after a tick bite
- Expanding redness or a worsening rash
- Persistent headache, body aches, or unusual fatigue
- Signs of infection at the bite site
- Uncertainty about whether the tick was removed completely
For bite photo comparisons, see Tick Bite Photos: How to Identify It Clearly. For pet-related concerns, you may also find Dog Tick Bite Photos: How to Identify It Clearly helpful.
How the Tick Identifier app can help
If you want a fast way to compare what you see, the Tick Identifier app can support your photo-based review. It is a practical tool when you’re trying to make sense of tick markings, body shape, and other visual features from an image.
Try the app here: Tick Identifier app on the App Store.
You can also read more about the tool on the site’s Tick Identification App page.
FAQ
Are tick markings enough to identify a tick?
Not usually. Markings are helpful, but a reliable comparison should also include body shape, size, legs, and whether the tick is flat or engorged.
Do tick markings change after the tick feeds?
Yes. Feeding can make a tick swell and stretch, which may hide patterns or make colors look different from their original appearance.
Can I identify a tick from one blurry photo?
Sometimes, but it is difficult. A clear top-down photo in good light usually gives better results than a single blurry image.
What should I do with the tick after removing it?
If you want to keep it for identification, place it in a sealed container or bag. If you are uncertain about next steps, follow public-health guidance or ask a healthcare professional.
Where can I compare tick markings with examples?
Use reference pages such as the site’s photographs and identification guides, including Tick Identification Chart: How to Compare Ticks by Photo and Deer Tick Identification, when those examples match the kind of tick you found.
Final takeaway
Tick markings are a useful starting point, but they work best when combined with other visible features and clear photos. If the tick is tiny, swollen, or hard to see, do not rely on markings alone. Use a guide, compare carefully, and get help if you have concerns after a bite.
For a quick comparison tool, try the Tick Identifier app and explore the site’s identification guides when you need a second look.
Try the Tickidentifier app
Use the app when you want a faster photo-based check before comparing details manually.