Tick Identification Guide
Tick Bite Photos: Real Examples and What Changes Mean
See real CDC tick-related rash photos, learn why bites do not follow one daily pattern, and know when to seek medical advice.
Updated September 7, 2026: sources and examples checked.
Tick bite photos can be helpful when you are trying to understand what you found on skin, but they are not always straightforward. A tick bite may look like a small red bump, a dark dot, a mild rash, or, in some cases, almost nothing at first. The appearance can change over time, and the skin around the bite may react differently from person to person.
This guide focuses on how to read tick bite photos clearly, what features to look for, and when it is a good idea to get medical advice. It is written as a practical identification resource, not a diagnosis tool. If you want to compare the tick itself too, you can also review Tick Identification Chart: How to Compare Ticks by Photo.
Safety note: Remove an attached tick promptly. Use clean, fine-tipped tweezers close to the skin and pull steadily upward without twisting; clean the skin and your hands afterwards. Seek medical advice for a new rash, fever or feeling unwell after exposure. A photo is not an infection test. Source
What tick bite photos can show you
Good photos can help you compare what you see on skin with common bite patterns. A useful photo usually includes a clear view of the whole area, a closer view of the skin change, and good lighting without heavy filters.
When reviewing a photo, look at the following:
- Size of the mark: Is it a pinpoint spot, a small bump, or a wider patch?
- Color: Is the area pink, red, purple, brown, or darker than the surrounding skin?
- Shape: Is it round, irregular, ring-like, or flat?
- Center: Is there a tiny puncture point, crust, scab, or a visible attached tick?
- Change over time: Has it become larger, warmer, or more irritated?
One photo rarely tells the full story. A clearer comparison comes from taking the same area over several hours or days with the same lighting and distance.
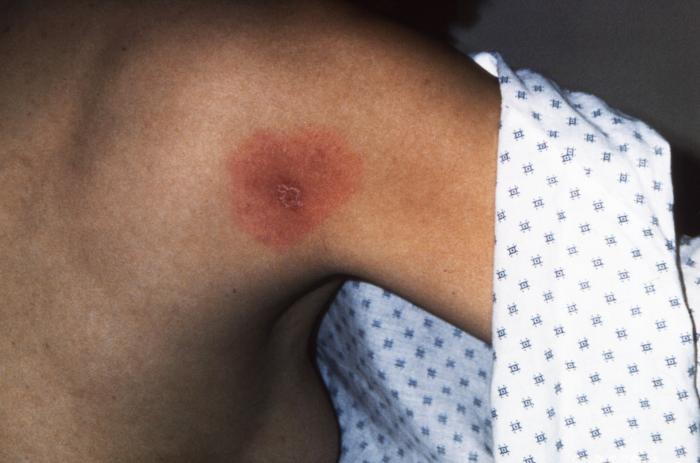
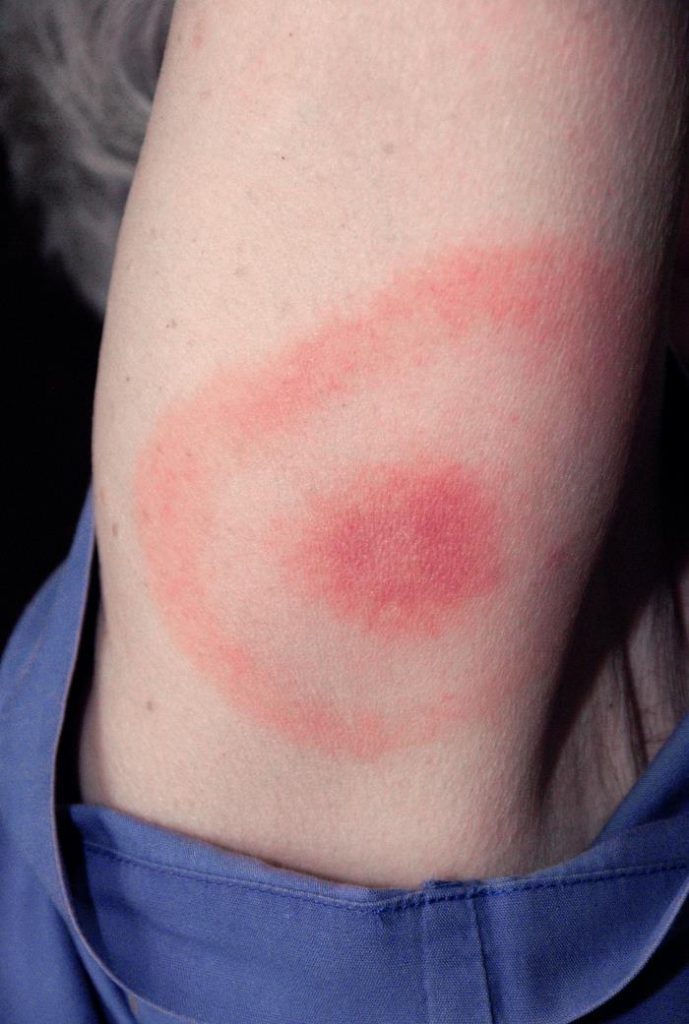
These two photographs show diagnosed Lyme-related rashes, not the full range of tick bites. Neither source supplies a day-by-day sequence. They cannot diagnose a new mark, rule out infection, or represent every skin tone and presentation.
Why there is no universal day-by-day photo chart
CDC distinguishes a small immediate bump, which commonly fades in a day or two, from erythema migrans, which can start 3–30 days after a bite and gradually expand. It does not always form a bull’s-eye. A rash is not required for every tick-borne illness. Do not wait for a photograph to match these examples before seeking advice about symptoms. Source
Common visual clues in tick bite photos
Tick bite photos often show one of a few common patterns. These do not confirm a specific illness, but they can help you decide what to watch for next.
| Photo clue | What it may look like | What to note |
|---|---|---|
| Small puncture spot | Tiny central dot or scab with little redness | Often appears soon after the bite or removal |
| Mild local irritation | Small red, pink, or itchy bump | Can look like other insect bites |
| Attached tick visible | Dark or brown oval body on the skin | Remove promptly with fine-tipped tweezers following CDC guidance; do not wait for a photo comparison or an appointment |
| Expanding rash | Patch that becomes larger over time, sometimes ring-like | Track the size and date; seek medical advice if it spreads |
| Healed bite | Fading redness or a small crust | May leave temporary discoloration |
Some bites do not leave a dramatic mark. A person may have a tick attached and only a slight skin change afterward. That is why a clear photo, plus a timeline of symptoms, matters more than a single image.
When to get advice. Tell a clinician when and where exposure may have happened and describe symptoms even if the skin change is faint. For bites on pets, contact a veterinarian rather than applying human rash comparisons. Source
How to take clearer tick bite photos
If you are documenting a bite for your own records or to show a clinician, try to capture the area in a simple, consistent way.
- Use natural light or a bright lamp without flash glare.
- Take one photo from farther away to show location on the body.
- Take a second photo closer up to show the bite itself.
- Keep the camera steady and focus on the skin, not the background.
- Include a reference object, such as a coin or ruler, if helpful for size.
- Repeat photos at the same time each day if the area changes.
Avoid using heavy filters, beauty modes, or zoom that makes the image blurry. If there is an attached tick, take the photo before removal only if doing so does not delay appropriate care.
What can make a photo misleading
- Shadows: They can make a small bump look larger than it is.
- Skin tone variation: Redness may be harder to see in some lighting.
- Scratching: Irritation from scratching can make a bite look more inflamed.
- Other skin conditions: Heat rash, folliculitis, and other insect bites can look similar in a photo.

When to pay closer attention
Many tick bites are minor and improve on their own, but some signs deserve more attention. Watch for changes rather than assuming the first photo is the final appearance.
Seek medical advice if the bite area or your symptoms include any of the following:
- a rash that expands or changes shape
- fever, chills, or flu-like symptoms
- new fatigue, headache, or muscle aches
- joint pain or swelling
- facial weakness or drooping
- severe redness, warmth, swelling, or pus
- an attached tick that you cannot remove safely
If you are in a region where tick-borne illnesses are common, or if the tick was attached for a long time, it is especially important to follow local public health guidance and speak with a clinician about next steps.
Warning: A photo can help document a bite, but it cannot confirm whether a tick transmitted an infection. Symptoms and timing matter, so do not rely on appearance alone.
Tick bite photos vs. other common skin marks
Not every small red spot is a tick bite. This comparison can help you avoid overreading a single image.
| Possible skin mark | Typical photo appearance | Common difference from a tick bite |
|---|---|---|
| Mosquito bite | Raised, itchy bump | Often appears quickly and fades sooner |
| Flea bite | Small clustered bumps, often on legs or ankles | Usually multiple spots, not one isolated point |
| Skin irritation | Red patch or patchy dryness | May follow friction, sweat, or product use |
| Tick bite | Tiny puncture, local redness, or a spreading rash later | May have a history of outdoor exposure or a visible tick |
When in doubt, compare the photo with a recent timeline: when you were outdoors, when the mark first appeared, and whether it is changing.
Helpful related identification pages
If you are trying to identify the tick itself, not just the skin mark, these guides may help:
If the bite was on a pet, you may also find these pages useful:
- Dog Tick Bite Photos: How to Identify It Clearly
- Dog Tick Identification
- Dog Tick Species: Complete Guide
FAQ: tick bite photos
How can I tell if a photo is really a tick bite?
Look for a small puncture point, localized redness, or a rash that appears after outdoor exposure. Still, photos alone cannot confirm a tick bite with certainty because many other bites and skin reactions look similar.
What should a tick bite photo include?
A useful photo includes the whole area, a close-up, and something for size reference if possible. Good lighting and repeated photos over time are often more helpful than a single image.
Can a tick bite look like nothing at all?
Yes. Some bites leave only a tiny mark or no obvious change early on. That is why you should pay attention to exposure history and symptoms, not just the first photo.
Should I take a photo before removing a tick?
If it is safe and does not delay proper removal, a quick photo can be useful for records. The main priority is safe removal and then cleaning the area according to public health guidance.
When should I contact a doctor after a tick bite?
Contact a healthcare professional if you develop fever, expanding rash, headache, fatigue, joint pain, facial weakness, or if the skin becomes increasingly red, warm, or swollen.
Ticky: a pet-fur camera aid, not a rash diagnosis
The Ticky app is described as a camera-filter aid for spotting ticks in pet fur. It is not a human rash analyser, a medical diagnosis tool or a verified symptom diary. Keep unfiltered skin photographs and dates in your own records for a clinician.
For more identification guides and photo-based resources, visit the Tick Identifier homepage or browse the latest Tick Identification Guides.
Explore Ticky for pet tick checks
Ticky offers camera modes for pet-fur checks. It does not diagnose a rash or infection.